This post was originally written a couple of years ago when I was building out an earlier version of Auxo. There have been some changes to the tools and libraries that are available now for solving some of the problems outlined in this article, but I think most of the concepts are still valid.
Auxo vaults are a new product by PieDAO, working through a limited release in March 2022 ahead of a wider launch this year. The product is a yield generating vault that aims to work across multiple chains and tokens, reducing the complexity and switching costs inherent in L2 moves.
We learned a lot building Auxo, and wanted to share a series of engineering posts on some of the lessons we encountered along the way. In this section, we cover in detail the process of connecting a React DApplication to multiple L2 networks simulataneously, using ethers.js and the Web3-React libraries. The code for Auxo is publicly available and can be found at the github url below.
The first half of this article covers the relevant basics of providers and connectors with ethers and Web3React, which can be skipped by users who are more familiar with these technologies, the second half covers the provider switching approach we use in Auxo, and how we connect to multiple providers simultaneously.
Basics of a Multichain React Application
One of the first challenges when trying to build a DApp versus a standard web application is understanding the differences in components required to properly interact with the blockchain. I won’t go into too much detail here as there are plenty of excellent articles on the subject, but it is worth covering the most relevant challenges and components for our purposes.
A quick overview, credit to:
Top Web3 Architecture Layers Explained: Frontend, Backend, and Data
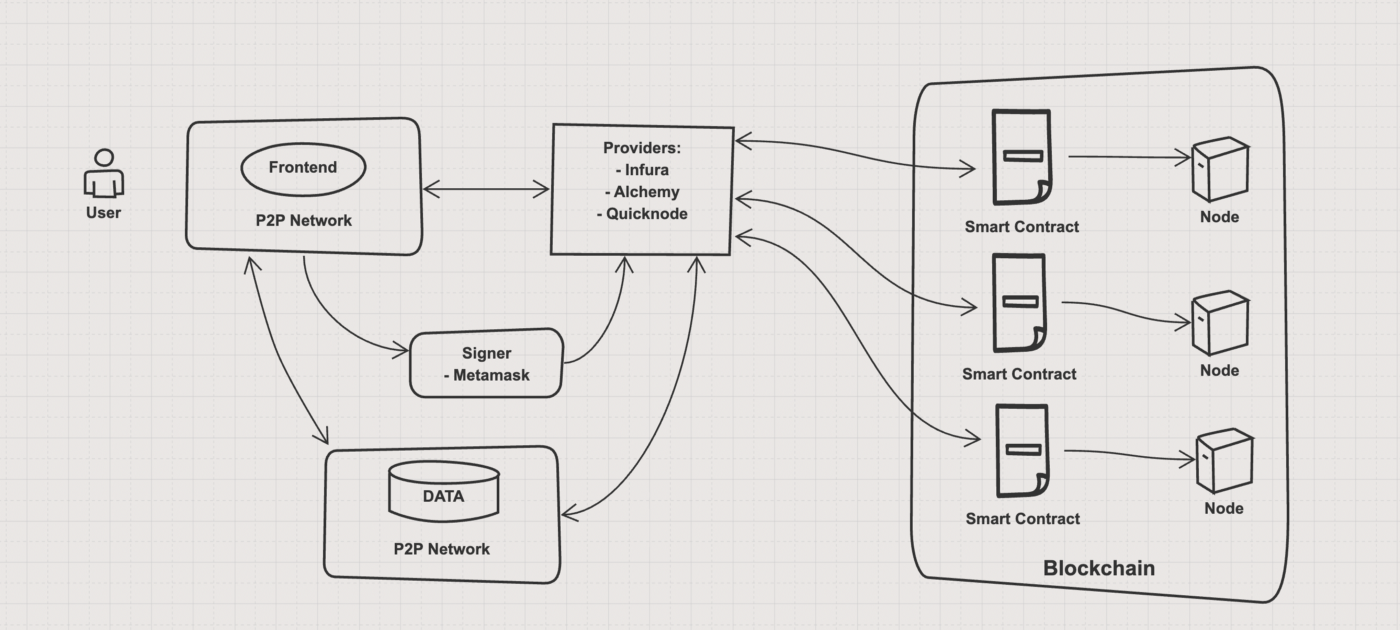
The basic architecture of a DApp is based around 2 key data flows:
- Call data (reads)
- Transactions (writes)
| Type | Call | Transaction |
|---|---|---|
| Cost | Free | Requires Gas |
| Connection | Provider | Signer |
All data requires that we establish a connection to the relevant blockchain.
There are many different ways of doing this but all of them involve connecting our React application to a provider.
The provider is responsible for routing our requests to get/send certain data through one of the many nodes that is participating in the network.
Important point #1: A single provider connects to a single network
We will come back to point #1 but the key takeaway is that, when building a multichain app, we need to make sure we have at least 1 provider configured for each network.
Important point #2: different providers expose different data and methods
Let’s explore how we might instantiate a provider using the ethers.js library:
// a JsonRpcProvider
new ethers.providers.JsonRpcProvider();

// the base provider provided by ethers, connecting to the ethereum mainnetwork
const chainIdMainnet = 1;
new ethers.providers.BaseProvider(chainIdMainnet);

// augmenting the ethers provider with additional functionality
new Web3Provider(provider, provider.chainId);
This might look a bit confusing, namely:
- Why do we have different provider objects that essentially do the same thing (connect our DApp to on chain data)?
- Why is this important in our multichain app?
- Why are we wrapping providers in providers?
The simple answer is that different providers expose different methods and data for interacting with our on chain data.
At a base level, we just want to make JSON RPC calls to a node, on the network of our choosing. What we also want, are convenient methods to interact with the blockchain, and that is where the Web3React library comes in:
The Web3React Library Provider
Noah and the team at uniswap have built a really excellent set of hooks for interacting with Web3 components that I highly recommend: web3-react. It’s a little sparse on documentation but has the following advantages over the popular alternative web3 modal:
- Fully customizable to your application
- React based and hooks based
- Used in production in the Uniswap ecosystem
Implementing Web3 react gives us access to a ton of very useful hooks, for our purposes:
- Access to the current chainId
- Access to the current provider as a
libraryobject - Routes network calls through metamask RPC for that network, if connected
- Gives us access to properties like the currently connected account
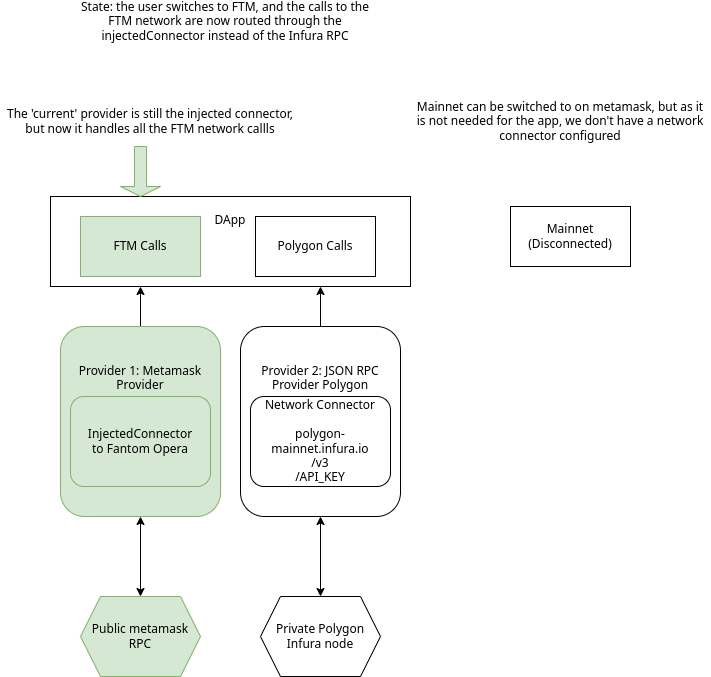
Important point #3: the current provider represents the primary connection used by the application.
Importantly this is the provider/network used when signing transactions, and in the case of Metamask, the chain which the user has chosen to connect to on Metamask.
While Web3-React gives us all sorts of hooks to interact with a single chain at a time, we still need to pull data from our other chains, even if the user is not connected to any of them.
Setting up Network Connectors For all chains
Connectors determine the way in which the provider will connect to the blockchain. The provider exposes methods and data to interact with our contracts, whereas the connector actually handles the connection to the chain.
Web3React exposes a number of connectors, for our purposes we will focus on 2:
- The injected connector
- The network connector
Network connectors require us to provide an RPC url, then they route calls to the network through that URL, even if the user is not connected to our app with metamask:
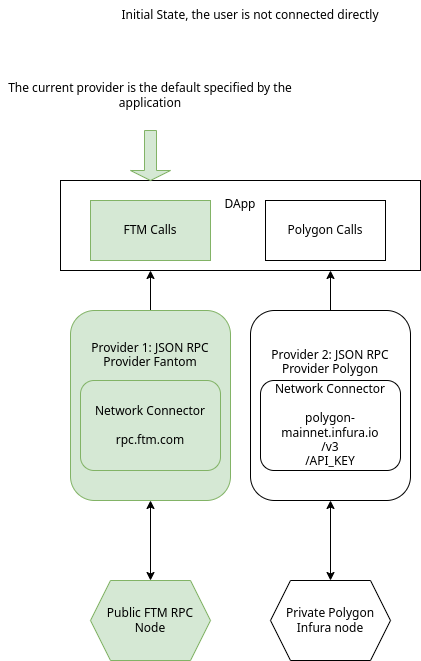
Injected is just the metamask connector.
When metamask is connected, all RPC calls to the currently connected chain are handled through Metamask’s own Infura RPC, we do not need to bring our own RPC connection.

Instantiating the InjectedConnector is as simple as passing an array of
supported chain IDs:
const SUPPORTED_CHAINS = {
  FANTOM: 250,
  POLYGON: 137,
  MAINNET: 1,
};

const injected = new InjectedConnector({
  supportedChainIds: [SUPPORTED_CHAINS.MAINNET, SUPPORTED_CHAINS.FANTOM, SUPPORTED_CHAINS.POLYGON],
});
If and when the injected connector is activated, metamask will handle all RPC requests for that network.
This is great, but what about the other networks?
Here we need to make sure we have fallback network connectors in place, for cases when the user is not signed in:
Important point #4: network connectors do not require sign in, so we can use them as defaults or when other connectors are not available.
export const RPC_URLS = {
  [SUPPORTED_CHAINS.MAINNET]:
    "https://mainnet.infura.io/v3/" + process.env.REACT_APP_INFURA_API_KEY,
  [SUPPORTED_CHAINS.FANTOM]: "https://rpc.ftm.tools/",
  [SUPPORTED_CHAINS.POLYGON]:
    "https://polygon-mainnet.infura.io/v3/" + process.env.REACT_APP_INFURA_API_KEY,
};

export const network = new NetworkConnector({
  urls: RPC_URLS,
  defaultChainId: SUPPORTED_CHAINS.MAINNET,
});
This is fairly simple with a node like Infura, simply create an account, add the
infura key to a .env file, and we will be connected, by default, to the
Ethereum mainnet on first load of the application.
- You’ll notice that some networks, like FTM, have public RPC URLs that we can connect to, and we don’t need to provide infura details
This leads us to a question though - how do we pull data from multiple chains simultaneously.
Implementing Multichain
Implementation of multichain requires that each network call is routed through a provider connected to the correct network regardless of the current network.
How can we do this:
- For each chain, we need to have a network connector configured
- When we fetch the contracts, the multicall provider needs:
- A library (either a JSON RPC provider or Injected Provider)
- Some parameters about the new chain
- Refresh rate (# blocks)
- Chain Id
- Multicall address
- We also need to fetch the block number, by chain
Getting Providers
In the case of a single provider, we have the current workflow:
- Open the application
- Connect to the default NetworkConnector using the RPC URL provided, on the default chain.*
- If the user connects via Metamask, switch to the InjectedConnector
- All requests will now be routed through metamask, on the chain that the user selects
*You specify the default chain when setting up the network connector on Web3-React. In the case of Auxo at time of writing, most of our vaults are on the FTM network, so we default to connecting to that.
What we also need to do, is configure and make available backup providers for each of our networks.
Step 1: Create a provider for each chain
We will explore the 2 chain case for this, but the approach can be extended for N chains.
Let’s say we want to connect to both FTM and Polygon. Assuming the user is not connected to either we are going to need:
- A provider for each network
- An RPC endpoint hooked up to a NetworkConnector, for each chain
- A way to make the provider accessible to the contract calls
Instantiating 2 providers is easy enough:
const ftmProvider = new ethers.providers.JsonRpcProvider(
  RPC_URLS[SUPPORTED_CHAINS.FANTOM]
);
const polygonProvider = new ethers.providers.JsonRpcProvider(
  RPC_URLS[SUPPORTED_CHAINS.POLYGON]
); **
Where the RPC URLS for FTM and Polygon are defined as such:
[SUPPORTED_CHAINS.FANTOM]: "https://rpc.ftm.tools/",
[SUPPORTED_CHAINS.POLYGON]: "https://polygon-mainnet.infura.io/v3/" + process.env.REACT_APP_INFURA_API_KEY,
What we now have are 2 baseline JSON RPC Providers from which we can make network calls to Polygon and Fantom
Step 2: Make the Providers accessible to the application
Inspired heavily by the approach used by ribbon.finance, we can use react-hooks and the React Context API to allow our application to access the providers we just created.
Recall how we use the React Context API (here is a complete summary if you are new), to share data between components without using Redux or prop drilling:
- use
React.createContextto create a new Context object, containing the shared data we want to pass to different components - Create a
Context.Providerwith avalueset to our default value of the context, and taking in react nodes as children - Wrap the application in the
Context.Provider - Access the context data with
React.useContexthook and passing in thecreateContextobject
First, we create a React Context object, containing each of the providers:
const providers = {
  [SUPPORTED_CHAINS.MAINNET]: ethereumProvider,
  [SUPPORTED_CHAINS.FANTOM]: ftmProvider,
  [SUPPORTED_CHAINS.POLYGON]: polygonProvider,
};

export const MultipleWeb3Context = React.createContext(providers);
Next we create a global MultipleWeb3ContextProvider, that handles the passing of all context providers to the application:
export const MultipleWeb3ContextProvider = ({ children }: { children: React.ReactNode }) => (
  <MultipleWeb3Context.Provider value={providers}>{children}</MultipleWeb3Context.Provider>
);Finally, we wrap the application root in the context:
// index.tsx
ReactDOM.render(
  <React.StrictMode>
    <BrowserRouter>
      <MultipleWeb3ContextProvider>
        // our new context providers
        <Web3ReactProvider getLibrary={getLibrary}>
          //our exisitng web3react
          <Provider store={store}>
            <App />
          </Provider>
        </Web3ReactProvider>
      </MultipleWeb3ContextProvider>
    </BrowserRouter>
  </React.StrictMode>,
  document.getElementById("root"),
);
This underscores an important point:
MultipleWeb3Contextcontains our fallback providers for all chains, these are not handled byuseWeb3ReactWeb3Reactexposes additional hooks and data for a single chain
Essentially, useWeb3React will handle a single chain, and if the user is
connected will allow us to work with the user’s account details, whereas
MultipleWeb3Context will provide us with calldata from other chains, even if
the user is not currently connected to those chains.
Step 3: Make contract calls using the relevant provider
To close the loop, we need to ensure that on chain calls for each of the Auxo vaults, are routed to the correct network.
We connect to our contract using ethers.js. Ethers creates us a Contract
object, which provides an interface between our smart contracts and our
Typescript application. It requires a provider to be passed to the Contract
object, which means each Contract object is connected to a specific network.
Our intended workflow is:
- Check which chain our Auxo vault is on.
- Connect to the contract using the provider given to us with
useWeb3ReactifuseWeb3Reactis on the same chain as our contract. - If
useWeb3Reactis on a different chain to our smart contract, use one of the fallback providers when creating the new Contract object.
Checking which chain our contract is on is simple enough, as in the Auxo state, each Vault is instantiated ahead of time with a contract address and chainId:
// vault.state.ts

const vaultState = {
  vaults: [
    {
      name: "Polygon USDC",
      address: "0xA...",
      chainId: 137,
      // ...
    },
    {
      name: "Fantom WFTM",
      address: "0xB...",
      chainId: 250,
      // ...
    },
  ],
};
We can therefore define a useCallback hook to return a getter for each provider:
export const useMultipleProvider = () => {
  const providers = useContext(MultipleWeb3Context);
  const getProviderForNetwork = useCallback((chainId: number) => providers[chainId], [providers]);

  return {
    getProviderForNetwork,
  };
};
This getter getProviderForNetwork will allow us to access the providers inside
of conditions and loops, whilst following the react rules-of-hooks.
Pass the chainId to the callback, and return the backup provider for that chain.
Actually fetching the contracts
The hook we use the fetch the contracts takes in an array of objects, containing all the info we need:
type MultipleMulticallContractArgs = {
  address: string; // the contract address
  chainId: number; // the chain id of the deployed contract
  ABI: any; // the contract ABI
};
For each contract, we need to check the chainId versus the currently connected chain Id in order to determine whether to use the Web3ReactProvider, or the MultipleContextProvider:
export const useMultipleContracts = (contractArgs: MultipleMulticallContractArgs[]) => {
  // fetch the web3React data for the current cuonnection
  const { library, chainId: currentChainId } = useWeb3React();

  // grab our network getter from earlier
  const { getProviderForNetwork } = useMultipleProvider();

  return useMemo(
    () => {
      return contractArgs.map((args) => {
        // default to using the library provider
        let provider: LibraryProvider = library;

        if (currentChainId !== args.chainId) {
          // we need to use a backup provider
          provider = getProviderForNetwork(args.chainId);
        }

        return getContract(provider, args);
      });
    },
    [
      /* ...  */
    ],
  );
};
The above code is using the library provider provided by useWeb3React and
assigning it to the provider variable. If the chainId we are currently
connected to matches the chain id of the vault, then we use the web3react
provider. Otherwise, we fetch the relevant provider from our list of reserve
providers for the network.